Establishing Web Analytics And Conversion Tracking Foundations Using The Google Marketing Platform
Last Updated: October 29, 2022
Building a quality website is the absolute cornerstone of everything that comes next in a digital marketing context. The coronavirus pandemic has significantly accelerated a shift to digital that has been a long-time trend. Yet, there are still so many companies that don’t understand the value of digital and the impact that their website is having on their business. I think one of the main reasons for this is they don’t have web analytics set up and they don’t have conversion tracking set up to understand the impacts various digital channels are having on lead generation efforts. My goal with this post is to un-mask the very ambiguous terms of web analytics and conversion tracking and how they can influence digital investments, and make you feel more confident about growing your companies influence on the web.
Let’s pretend for a minute that you’re doing marketing for an established mid-market company with 100 employees and an adequate budget to build the ideal website and configure everything just how you wanted it. Let’s also pretend you’ve got a 10k+ a month advertising budget that you’re using to send people to your website by running advertisements on Google Ads and social media platforms. Additionally, you have a sales team that’s doing cold outreach to people via phone and email. All in all, you’ve got thousands of people visiting your companies website every month. Your goal is to make sure that your digital marketing budget is being used effectively, and therefore you want to understand how people are interacting with your website and how it’s helping to generate leads for your company. Here are some sample questions you might ask:
- How many leads are we sourcing from digital?
- What are our most popular lead generation channels?
- How many people are visiting our social media pages from our website?
- How many people are sharing content from our website on social media?
- Are people reading our blog posts and other content?
- How many people are giving us their email address in exchange for a content download?
- How many people are registering for our webinars?
Many more questions than this will surface once your team gets into a rhythm with digital, but these are some common ones, and they all are trying to help guide investment decisions and generate sales for the brand. Companies will purchase or subscribe to a wide variety of tools to answer these types of marketing questions but there are a handful of common tools available that nearly everyone gets started with and serve as the backbone of marketing measurement on the web. Companies should look to master the fundamentals before moving on to more advanced toolsets. These tools are available in the Google Marketing Platform.
Google’s Marketing Platform
In this article, we’ll be talking about analytics and conversion tracking by leveraging the google marketing platform’s suite of products. Google makes some of the market’s most popular tools that you can use to measure the performance of your website, completely free. For example:
- Google Analytics
- Google Tag Manager
- Google’s Data Studio
- Google Search Console
- Google Ads (Requires Ad Spend)
We’ll talk about the role each of these products plays and how they can be leveraged to increase brand awareness, maximize discoverability, and generate leads for your company. Please note that there are more products in the Google Marketing Platform ecosystem, but many of the other ones are geared for high-scale companies unlikely to be reading this post.
Google Search Console
The first and most basic of the tools available to measure performance on the web is the Google search console. This is a tool that does not require a privacy policy to be in place and using it can increase the reach and provide valuable insights to even the smallest of websites. Google search console allows you to:
- Register your website with Google
- Upload XML sitemaps to help Google discover your content
- Get insights into organic search engine performance
- Be alerted of usability issues, penalties, and other items negatively affecting your site
- Understand your core web vitals and other performance data
- Check the indexing status of various URLs
- Get new content indexed more quickly by requesting a crawl
- And more!
Signup for search console here
Adding A Site To Google Search Console
You can add your site to the Google Search Console after signing up by clicking the site’s drop-down in the top left of the screen and clicking “Add Property”.
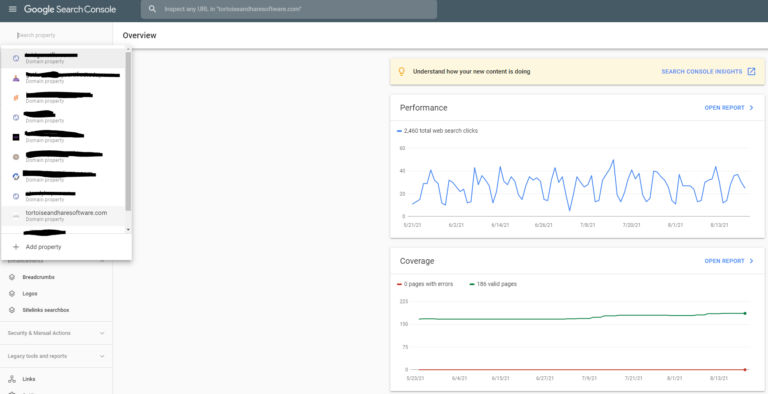
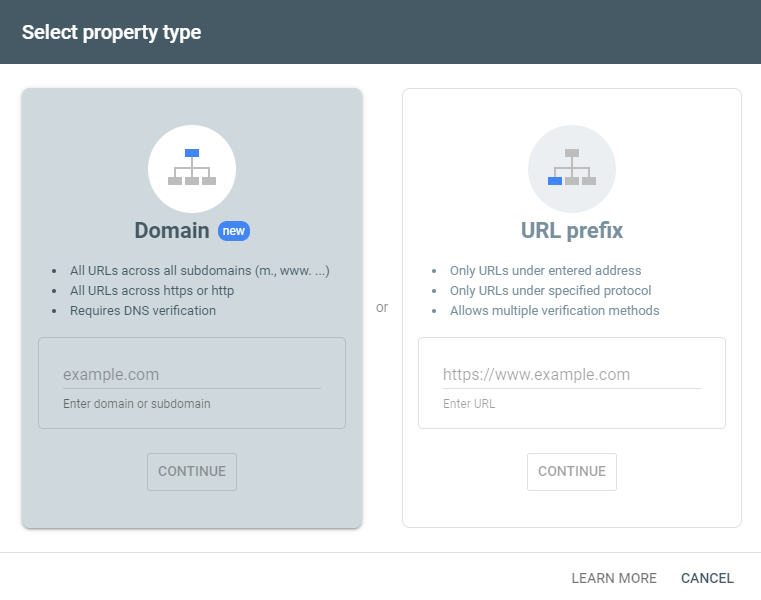
You’ll be shown a screen asking you to select whether you want to verify your site by domain, or by a specific URL prefix, such as https:// or http://. Unless you have a specific reason to register by URL prefix, choose domain. Enter the domain of your website, as shown in the graphic below:
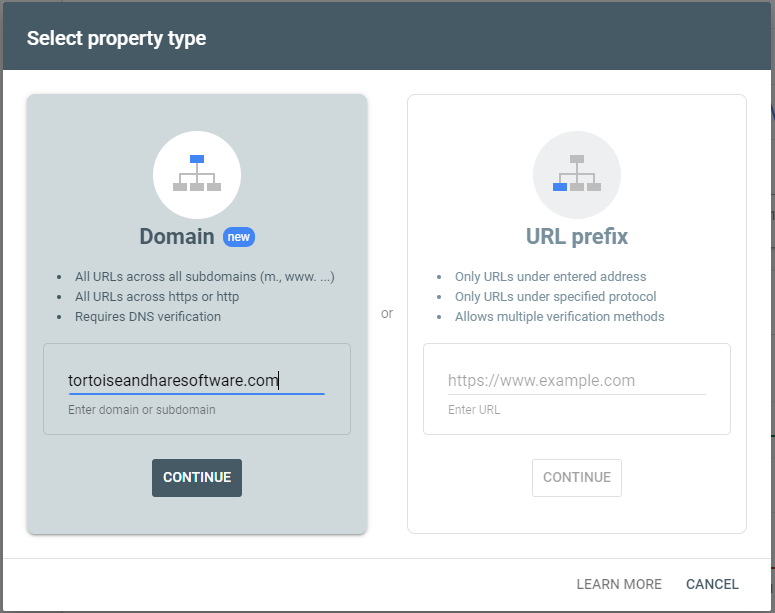
Depending on who you have your domain registered with, your options may change, but for most popular domain registrars, such as GoDaddy, you can get your domain auto verified, just by signing in. In the graphic below, clicking start verification will allow you to sign in and automatically verify the domain in Search Console.

If that option is not available, you can verify your domain by adding a TXT record to your DNS. Steps for this will be different, depending on the domain registrar, but it’s a matter of a simple copy-paste from the generated TXT record shown in Search Console, to your domain’s DNS configuration.
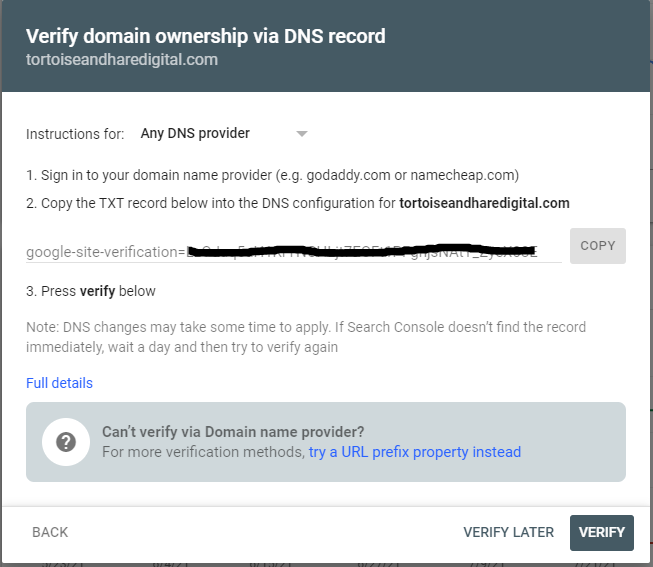
No matter the method you choose, once you click verify, and if you’ve done everything correctly, your domain’s ownership will be verified and your site will be registered with Google!
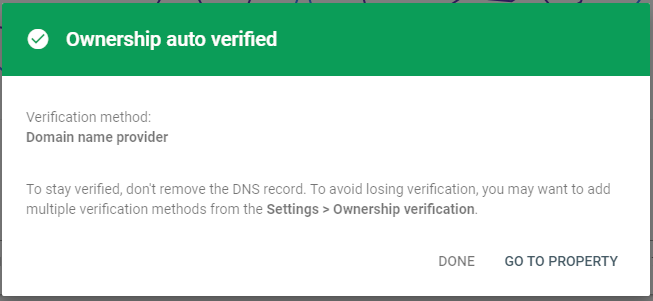
Once your domain is verified, you can click “Go To Property”. If you’re registering a new domain, there likely won’t be much to do for a couple of days while Google crawls your website, indexes your content, and understands what your site is about, so you can close out and return to Search Console in the future. If you’re registering an existing site, then you should get access to search engine performance data immediately, which you can use to analyze your site. See our beginner’s guide to measuring search engine performance.
We register all our client’s websites with Google upon launch to ensure that they are getting indexed in search.
Adding Your Domain’s Sitemap
If you’re running a business, you should regularly be producing content to educate your readers, tell stories, and increase exposure for your brand. You don’t necessarily want to be coming back to Search Console every time you publish something to manually request indexing, but you also don’t want to have to wait months and months for Google to re-crawl your site and index the new content. This is where adding your sitemap to Google can be a big help. Your sitemap is like the table of contents at the beginning of a book. You wouldn’t want to have to re-read an entire book just to see if a new chapter was added right? Just check the table of contents in the beginning. Instead of Google having to re-crawl your entire site every time to see if something new has appeared, it can just crawl your sitemap and see if there are any new URLs present.
Once you’ve registered your site with Google the next step is to add your sitemap. Click the “Sitemaps” button on the left-hand navigation. At the top of the Sitemaps screen, there is a place to add a new URL for your sitemap. By web convention, most sitemaps reside at yourdomain.com/sitemap.xml, if you are unsure of whether your website has a sitemap trying browsing to that address.
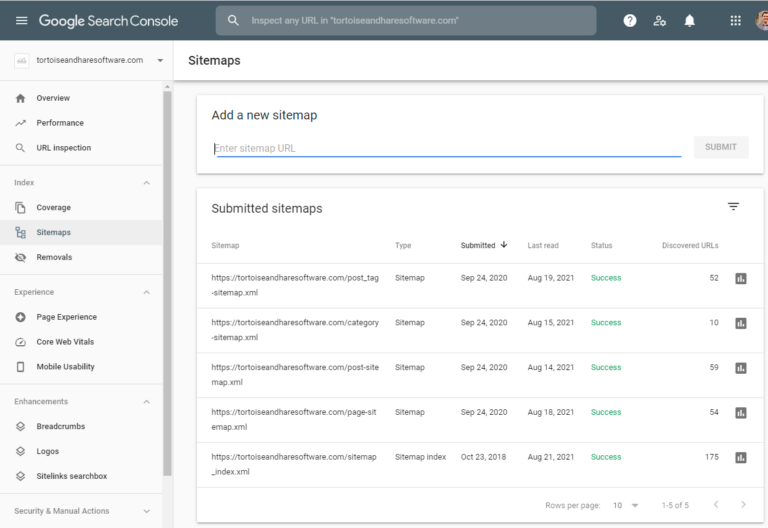
If you’re on WordPress and are using the Yoast SEO plugin like we are, then your sitemaps will reside there. We recommend adding the main sitemap, and the page sitemap, post sitemap, category sitemap, and post_tag sitemaps as illustrated in the graphic above. You can get the URL’s from the main sitemap at /sitemap.xml.
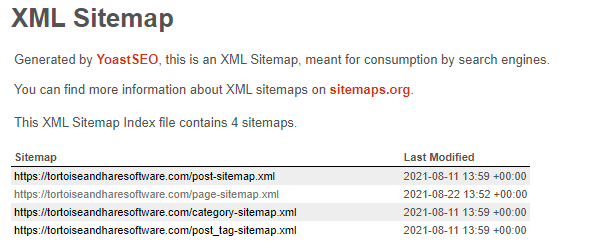
This is again something we do for all our client’s websites, and it ensures that new content is being easily discovered and indexed by Google in a timely fashion.
Why Your Company Needs Search Console
Once you have the basic setup of Google Search Console completed, Google will start collecting performance data on your website. For technology companies search engine performance is critical. We’ve already written about how important organic search is to the growth of SaaS companies, but SEO is of critical importance to MSPs, cybersecurity, companies, and other technology service providers as well because people find technology companies when they experience a problem and start researching a solution. I’ve spent almost all of my career split between digital marketing and software development, and still, the majority of contacts in my network think I do “IT stuff”. Technology is an extremely broad field and most people don’t have a deep understanding of what companies provide which specific services, and you have to remember that oftentimes you are selling to people who don’t understand your service offerings. Search engines are key to growth because they help surface your company when people are researching their problems. Google Search Console is one of the foundational tools to help you measure your search engine performance.
Google Tag Manager
The next tool in the toolbelt for measuring performance on the web is Google Tag Manager. Google Tag Manager is like a gateway to your website that allows you to publish small bits of code or “tags” without the need to edit your website’s code or involve a developer.
If you’re on WordPress we’ve created a plugin to seamlessly add Google Tag Manager to your website and conditionally load it based on the user’s cookie consent settings. This can be a big help when complying with data privacy regulations like the GDPR and CCPA. If you’re not on WordPress or don’t want to use the plugin, feel free to check out this Google Tag Manager installation guide.
Google Tag Manager is very popular amongst marketing teams in the modern era because modern marketing requires putting a lot of small JavaScript snippets for various things on your website. One of the most common of these is a pixel or a remarketing tag.
Marketing Pixels
Marketing pixels are small snippets of code that send information back to another website about browsing behavior. Let’s say a visitor comes to your company’s website while signed in to their LinkedIn account. Your website will send a signal back to LinkedIn that someone visited the site. LinkedIn will connect that pixel call to the visitor’s profile and they will become a member of your company’s remarketing audience. This allows us to do things like show them ads and create lookalike audiences. This greatly increases the focus and effectiveness of advertising dollars because your company is only advertising to people who have already indicated an interest in your brand by visiting your website.
Take a look at some of the LinkedIn audiences for the Tortoise and Hare Software website. We’ve created audiences for various segments of website visitors. There’s an audience of around 1400 visitors who have visited the TNHS website while signed into their LinkedIn profile over the past 90 days. That’s a digestible chunk of people to launch advertising campaigns to in order to generate new leads.
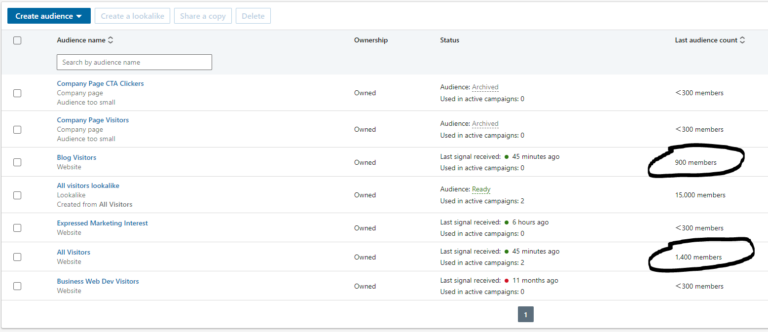
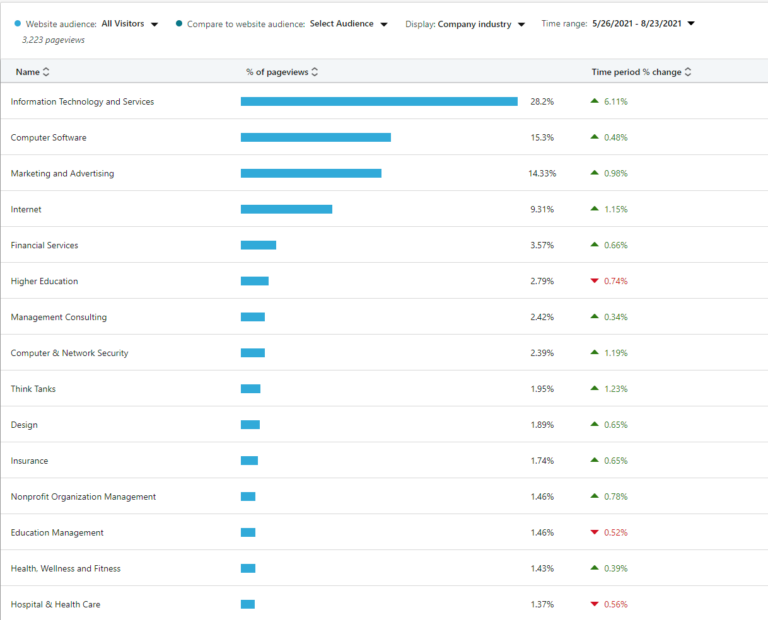
Most platforms will have some form of reporting available for their pixels that allow you to gain insight into aggregate characteristics of the types of people visiting your website. For instance, take a look at the website demographics report below for the “all visitors” audience. You can see that our top industries of visitors are:
- Information Technology and Services (28%)
- Computer Software (15%)
- Marketing and Advertising (14%)
- Internet (typically telecom providers, 9%)
These comprise about 70% of our website visitors, which tells us we’re doing a good job reaching the target markets of technology companies, and of course, competitors.
The point of this post isn’t to deep dive into LinkedIn’s advertising capabilities, but rather to help you understand that modern marketing teams are leveraging these pixels to focus their advertising efforts, gain valuable insights into their website’s visitors, and guide their digital marketing investments. We have pixels installed for:
- Google Ads
- HubSpot
- Quora
- Google Analytics
Each of these platforms has different user bases (with some overlap) reporting capabilities, and targeting capabilities. Mature companies are running integrated marketing campaigns across various platforms applicable to their business.
Installing Pixels On Your Website
At this point, you may be wondering what a pixel actually is and how you can get started with installing one on your website. Let’s take a look at what LinkedIn’s pixel looks like:
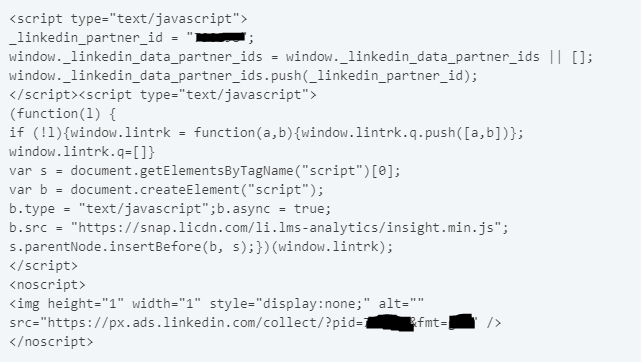
A bunch of Gobbledy Gook no doubt. Before tag managers you would have to send this piece of code over to your developer, along with some technical instructions for where to place the code on the website, they would have to create a dev ticket, put the code on the website, go through testing, and eventually, often months later, the code would be pushed to the live site. If for some reason there was a bug, you would have to repeat the process all over again until you got it right. The whole process was broken, and a huge bottleneck for what oftentimes amounts to little more than a copy-paste. Enter the tag manager.
Tag managers allow you to dynamically inject code onto your website. While they may not be a fit for everything you may want to do they are a really good fit for deploying simple pixels, and conversion tracking (which we’ll cover in a minute.
For common popular tags, there is a relatively easy setup. Check out the graphic below. We had to select a tag (the LinkedIn Insight Tag) enter the provided partner ID that LinkedIn gives, and choose a firing trigger. In this case, the trigger is that we want the tag to fire on all page views.
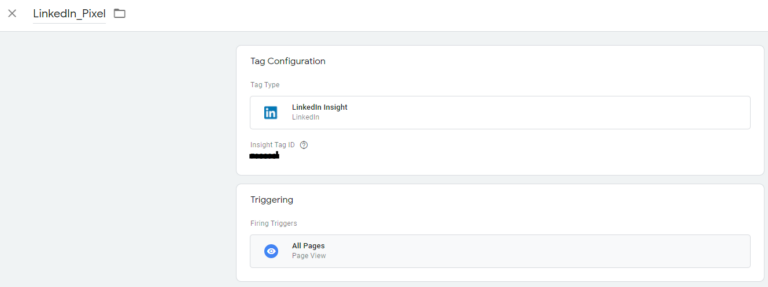
Once the tags have been configured you can publish the changes in your Google Tag Manager account and they are live instantly. A huge improvement over the way things used to be done.
Installing Conversion Tracking Tags On Your Website
Installing pixels is relatively simple, but things start to get a little bit more complicated when conversion tracking enters the picture. Let’s look at a relatable example of how conversion tracking might be installed via Google Tag Manager. Let’s pretend we have our remarketing audience available of 1,500 people that have visited our website over the past 90 days. Your company has just created a new whitepaper that you’d like to promote, so you decide to run an advertising campaign targeting those visitors from the last 90 days. You create some ads on LinkedIn and send them to a landing page for a content download. For example The Social Media Guide For Managed Service Providers.
People who click on the ad are given the option to exchange their email address for the downloaded piece of content (known as gated content). This is a great way to collect email addresses for further marketing and qualification. How do you know if people actually downloaded the content though? Was your ad campaign successful? To answer these questions we need to create a conversion event.
This generally requires a few similar steps:
- Create the conversion event in the platform
- Configure the conversion event in Google Tag Manager
- Publish the changes
- Test the changes
The first of those steps is to configure the conversion event in the platform. Continuing with our LinkedIn example lets configure a conversion event for email subscriptions within LinkedIn
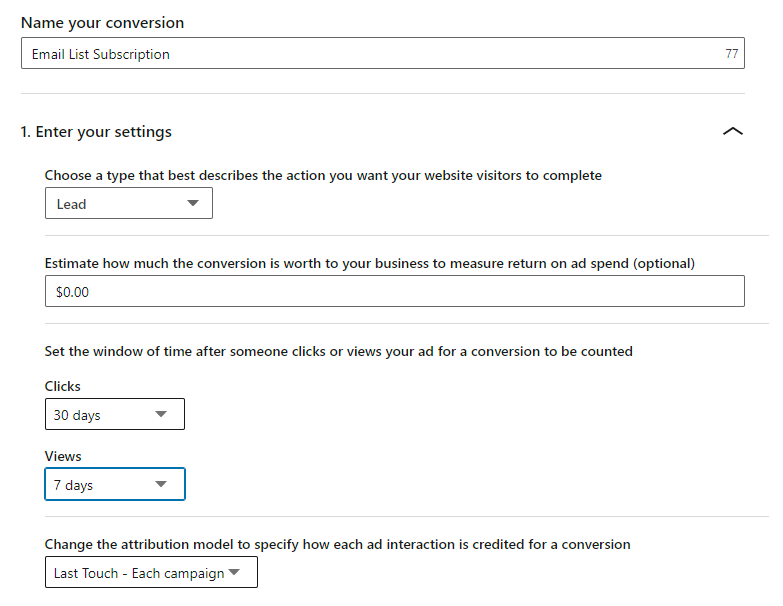
Within the LinkedIn advertising platform’s backend, we can create a conversion event and set a few details on what the conversion windows are after interacting with an ad, and the value of the conversion to the business.
From there we are given a snippet of code to fire whenever a conversion event occurs:
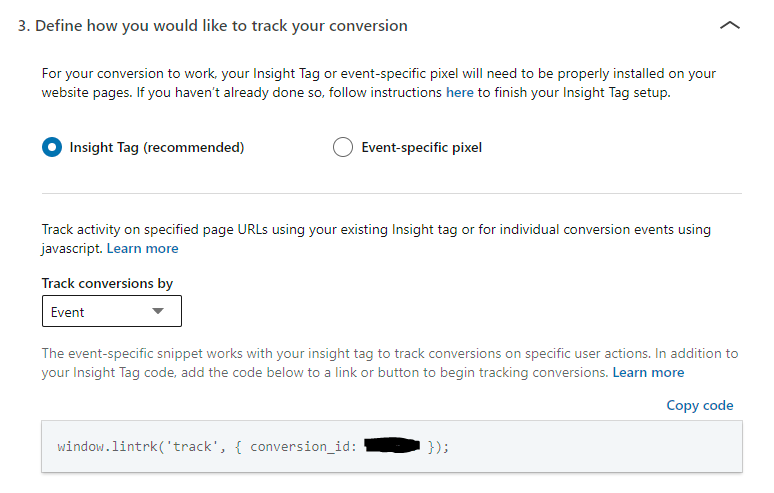
Once we have the snippet to fire from LinkedIn’s end, we need to install it via Google Tag Manager. This next bit is all going to be very site-specific, so take it with a grain of salt. There are entire companies dedicated to doing only tag manager deployments and configurations, and this stuff is one of the reasons marketing consultants exist. For the TNHS site, there are a couple of tags involved in the setup. The first is the custom event we’ve created. This event fires on Document Ready (basically whenever the web page finishes loading).
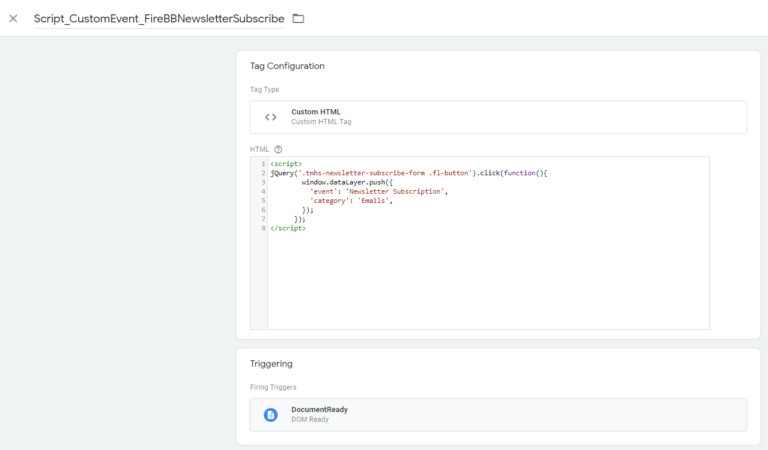
When the document (web page) is ready this script is written out to the page.
<script>
jQuery('.tnhs-newsletter-subscribe-form .fl-button').click(function(){
        window.dataLayer.push({
          'event': 'Newsletter Subscription',
          'category': 'Emails',
        });
      });
</script>
This script is going to attach an event handler to the subscription form’s button click event. When the button click event is fired, we are going to push a new event to the data layer. This event is going to be called “Newsletter Subscription”.

Now that we’ve configured our custom event tag we need to connect that custom even to a LinkedIn conversion. To do this we’ll create one more tag in Google Tag Manager. In the graphic below we will output the script that we took from when we created our LinkedIn conversion in the LinkedIn platform and we will fire it when the CustomEvent_NewsletterSubscription tag that we just configured is fired.
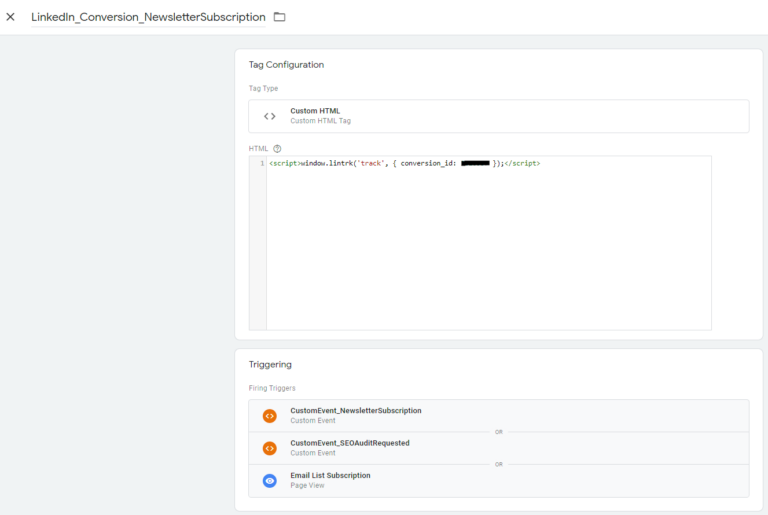
Once those two tags are taken care of we can publish our changes to the Google Tag Manager and test to make sure the event is firing correctly. We aren’t going to cover testing here because you would need some additional background on the inner workings of Google Tag Manager, but here is a great post on testing Google Tag Manager.
The Value Of Google Tag Manager
We’ve only walked through installed one pixel and one conversion event on one platform in this post, but pixels and conversion events need to be configured for each platform and there are plenty of other use cases for tag managers. We have at least 60 tags and triggers configured in the TNHS website’s tag manager. Installing these correctly, verifying that they work, making sure duplicate events aren’t firing, and staying organized within your Google Tag Manager account is no easy task, however, it’s a significantly better solution than managing all these tag deployments and changes through source code of your website and documentation residing who knows where to explain code to people. Google Tag Manager is one of the most essential and powerful tools in the modern marketing team’s belt. Hiring an experienced marketing consultant to help you make sense of deploying and configuring an instance of Google Tag Manager is well worth the expense. Correctly deploying these pixels and conversions serve as the backbone for getting quality marketing data, and optimizing your marketing investments.

Google Analytics
Unless you’re building your entire marketing strategy on LinkedIn advertising you’re probably going to have questions about your website performance across multiple marketing channels and not just platform-specific performance. Google Analytics, is going to be your centralized hub for web analytics across multiple marketing channels. There are 8 basic channels of digital marketing traffic illustrated in the graphic below.
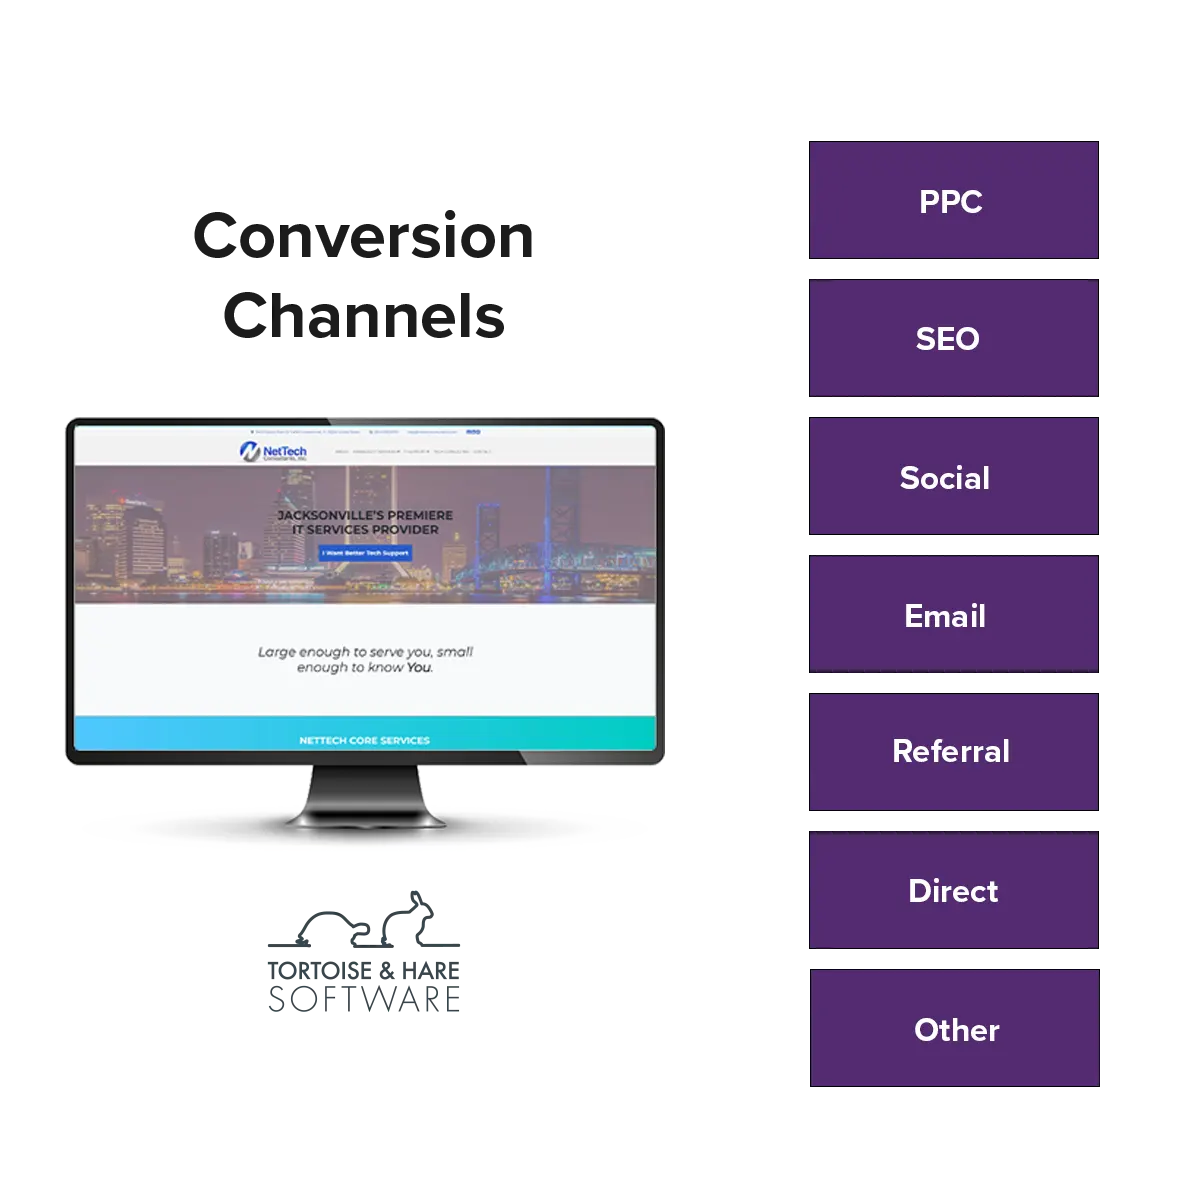
Traffic that’s sent to your website via cold calling, word of mouth, is generally going to be direct traffic as people are going to type your companies web address directly into the address bar and visit it or click a direct link.
Again, Google Analytics is going to be the next best thing to a customer relationship management tool (CRM) to track and manage the inflow of deals and marketing activity across all your marketing efforts. A CRM will be able to give you visibility into all the contacts created across both digital and offline efforts, and across a full sales team, if maintained properly. In a digital sense though, your web analytics platform, Google Analytics, in this case, is going to be your cross-channel point hub for optimization data and the de-facto way to measure digital marketing performance in aggregate.
Installing Google Analytics With Google Tag Manager
Installing Google Analytics with Google Tag Manager is a breeze. Signup for an account here. Once you’ve created an account you can create your first property. From the home screen look in the lower left and click “Admin”.

If you didn’t create a property during the account signup process, you can create one in the admin section. Click the tracking info area and get the tracking code for the property from the admin panel.
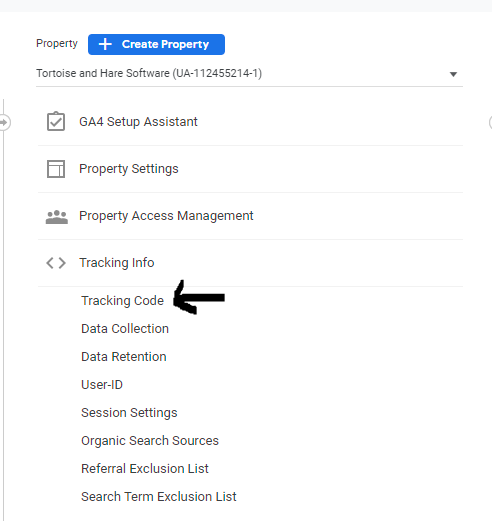
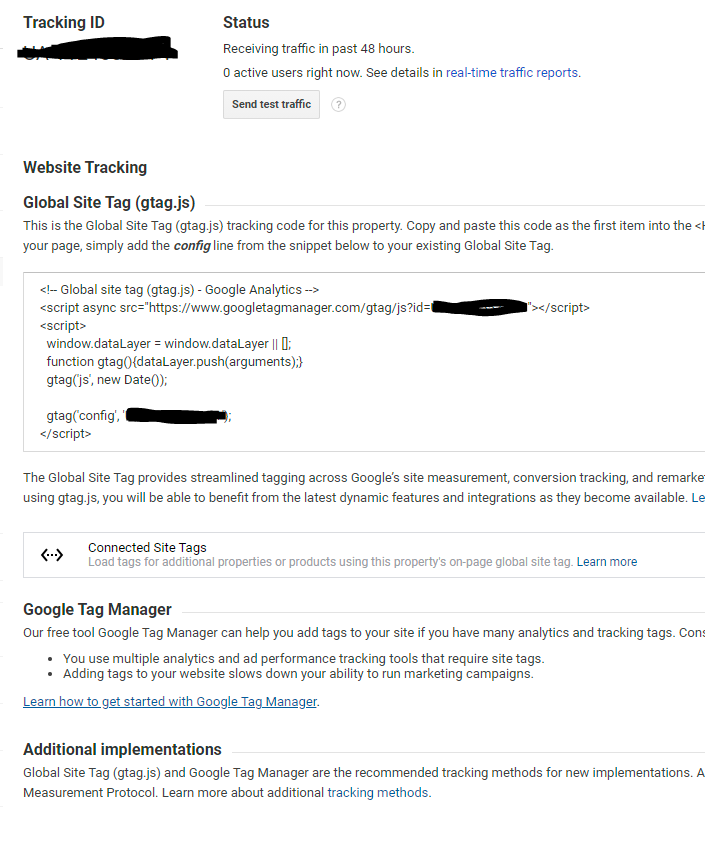
Snag the tracking ID from this screen (blacked out in the photo below. You don’t need the full snippet. It should look something along the lines of UA-xxxxxx-x.
Pop over to Google Tag Manager and create a Google Analytics Universal Analytics Tag. Select the track type page view and enter your tracking ID into a Google Analytics settings variable as illustrated in the graphic below. Choose a firing trigger of all pages, page view.
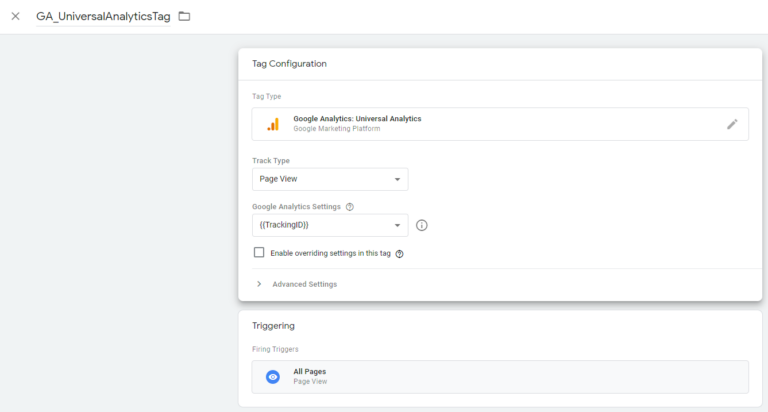
Publish the changes to your Tag Manager and viola, you will have Google Analytics installed through Google Tag Manager. Your site can now start to collect data from your website traffic and you should start to see traffic within 48 hours. Assuming your website has some traffic! Make sure to read the Google Analytics terms of service and make any updates to your website’s privacy policy that may be required.
Configuring Google Analytics
Google Analytics, like many things in marketing, is easy to get started with, but hard to master, and again there are entire companies that do nothing but Google Analytics! We aren’t going to dive deep into all the configuration settings of Google Analytics in this post, but we’ll touch quickly on one of the must-do items and that’s creating Goals.
Google Analytics goals are just like conversions in advertising platforms. They are specific actions you want users to take on your website. The difference is a lot of time you’re going to want to track a few more things than just leads generated. Many times there are web engagement goals, such as social shares, social media button clicks, scroll depth events, video plays, and other similar items that you may want to track, that aren’t necessarily tied to leads generated via advertising. These can help you get a more accurate view of website engagement that can help fine-tune the performance of your website, maximize engagement and be more confident moving towards digital advertising.
You can add goals by going to the admin panel of Google Analytics, in the view settings group you’ll see a nav item for Goals. You can click on Goals and create up to 20 goals for your website. You can see some example goals we’ve created for the TNHS website as of this writing.
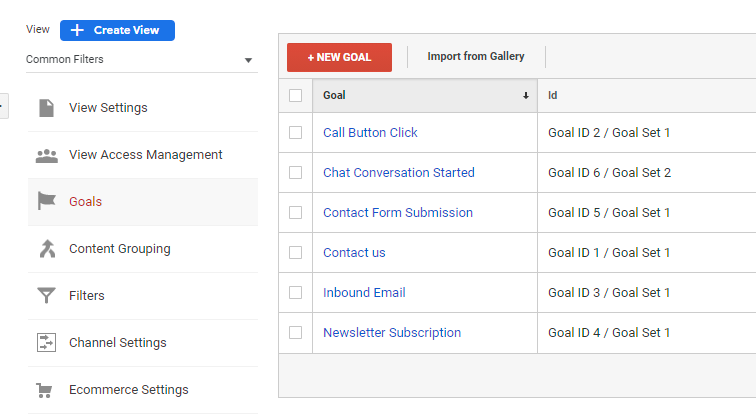
Once you’ve created your goals in Google Analytics you’ll need to create tags for custom events in Google Tag Manager to fire at the appropriate time, and when the custom event is fired, trigger a new data layer event for your Google Analytics goals. The process is similar to the custom event we created for a LinkedIn newsletter subscription event we went through above.
Once your goals have been configured, they will start appearing in Google Analytics reports in various places. Let’s take a look at some popular reports in Google Analytics that can leverage goals.
Google Analytics Channel Reporting
One of the most common reports I find myself pulling, again and again, is the channel report. You can find it by going to Acquisition > All Traffic > Channels.
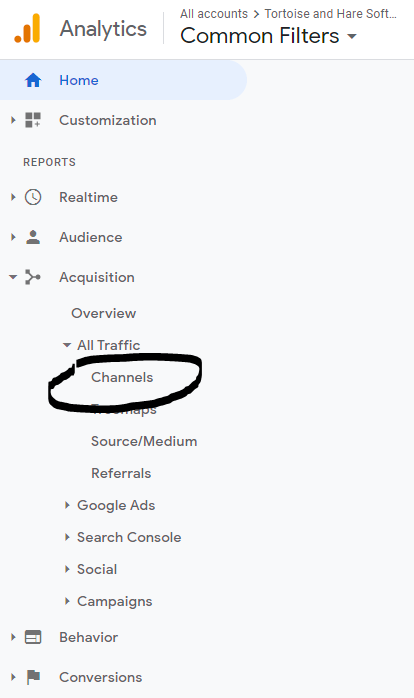
The channel report shows your performance data for each of the 8 default channels. In the top right you can select a date range for your report and see various stats that show you how each channel is doing. Below is a filtered view of U.S. traffic from January to July of this year. I’ve selected all goals on the right-hand side of the report. You can see conversion volume and conversion rates per channel. You can select a specific goal to see data for that goal, and you can click on a channel to drill down into the report further and see more details. For instance, clicking on the social media channel would allow you to see more details about which specific social media sites were driving traffic.
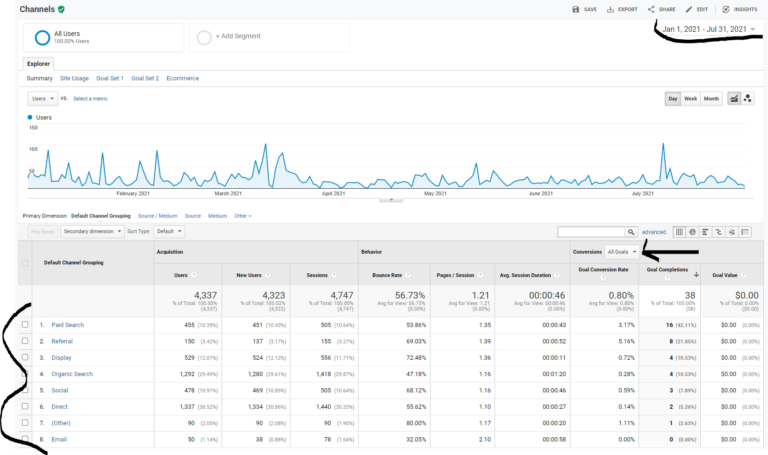
You can see that paid search was the best performing channel in terms of conversion volume so far this year and that it is converting a little more than 3% conversion rate. You can use this data to forecast campaign performance and plan your marketing budget. You can use a tool like our free pay-per-click calculator to estimate ad spend and potential revenue generated based on the value of a customer to your business.
Other Google Analytics Reports
Google Analytics is a very robust platform with numerous reports, ways to customize and analyze the performance of your website. You can create custom dashboards, schedule reports to be emailed to you at regular intervals, and even import offline conversions. Installing and configuring Google Analytics can help you understand top-performing content, bounce rates, time spent on site, and many more areas of website performance. Getting better visibility into how your website is performing can help you plan your marketing investments and campaigns.
Advertising With Google Ads
Let’s take a moment and envision a scenario. You’ve connected your site to search console, you’ve installed Google Tag Manager on your website, you’ve installed Google Analytics on your site. You’ve set up your Google Analytics goals and have been viewing reports on how your website is performing and you’re starting to get a feel for how a digital marketing program works and the impact that a website and various digital marketing channels can have on your business. You are seeing how a website is playing a role in generating leads and you start to wonder. How can I bring more people to my site and show them what my company has to offer?
For technology businesses, Google Ads can be a highly effective way to help new people discover your business. Technology businesses are very problem solution based and therefore very search-driven. Compare a technology business to a landscaping company. Landscapers can take photos of their work, post them on Facebook. People can see the quality of a companies work visually. It’s very easy to understand what a landscaper can do for you, because you can see the results with your own eyes. Technology businesses are not like that. People find technology businesses when they have a problem that needs solving, and in many cases, they don’t know how to describe what they are looking for, or what they want specifically. They very often will discover a company that meets their needs through stumbling across blog posts or searching for more generic terms like “it company”, “quoting software”, “crm software”, etc. These terms are very popular though, and many companies want to rank for them organically, but unfortunately, only a handful can. However, you can always bid your way to the top of the search results via Google Advertising via a pay-per-click campaign.
Google Ads offers a lot more than just search engine advertising. It’s also the way to create ads on YouTube, gmail, the Google Display Network, shopping campaigns, and more. These are all great tools, but they are often for more advanced advertisers looking to build a top-of-funnel audience and scale aggressively. If you’re just getting started with digital advertising for your technology business, you need to start with Google Search, and master converting high intent bottom of funnel keywords that are relevant to your business. If you can’t convert bottom of funnel terms, then your top of funnel efforts are going to be all the more disappointing.
See: 5+ Essential Google Ads Campaigns For Your Ad Account
Google Data Studio
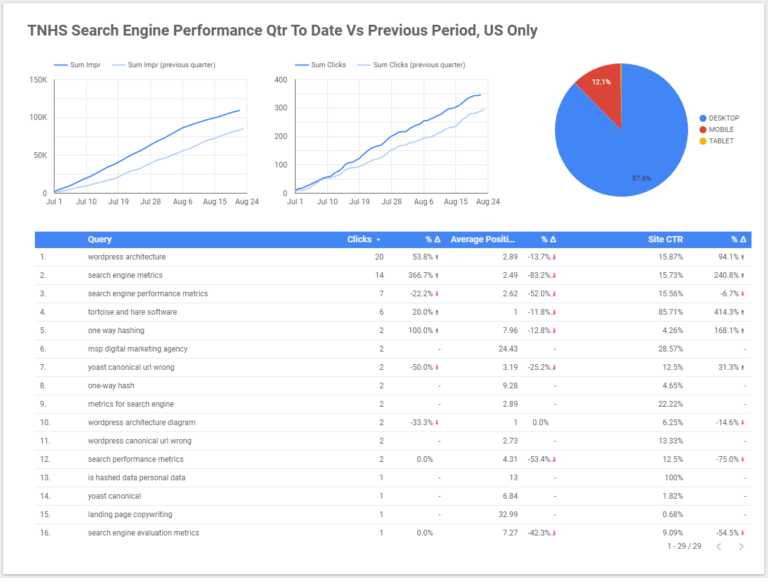
The last product we’ll touch on as part of the Google Marketing Stack is Data Studio. Products like Google Analytics, and Google Ads have their own native reporting, but what if you want to create a series of custom reports in a single document, and tie that data with data from other platforms such as social media channels? This is where Data Studio comes in and can be a big help for executive reporting. We leverage Data Studio for our monthly reporting for our retainer clients here and it’s a big hit. Since we customize all our reports to the individual client, and their data is proprietary we can’t share them here, but have included a sample report below for the TNHS website:

This report shows at a quick glance how organic search is going in the current quarter compared to the last one. You can quickly see where impressions and clicks have gone up or down, what the percentage of traffic is coming from each device type, and some of the top queries driving search engine traffic in the current period. Reports can be designed using a drag and drop editor, connected to data, and customized to the styling of the brand.
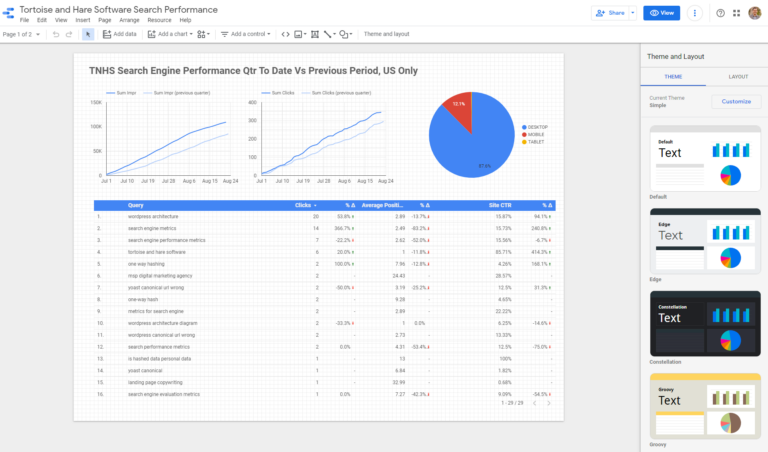
These reports can be scheduled at regular intervals and sent as a PDF to email addresses. We schedule monthly reports and import the screenshots into PowerPoint with commentary added as part of our monthly reporting process.
Establishing Web Performance Measurement Foundations
In this post, we’ve talked a little bit about establishing web performance measurement foundations with Google Marketing Platform’s products. We’ve talked about how setting up analytics and conversion tracking can help you get better insights into the performance of your website, and increase the confidence in making additional investments into digital marketing initiatives. We talked a little bit about:
- Google Search Console
- Google Tag Manager
- Google Analytics
- Google Ads
- Google Data Studio
All of these tools are free to get started with and can take you quite far on your companies journey. If your company is launching a digital marketing program in earnest you can’t go wrong with building out a quality website and using these tools as the backbone for your performance measurement plan. You can easily spend hundreds of hours learning about the intricacies of these tools and customizing them to your specific needs. Outsourcing to an experienced consultant often makes a lot of sense. Reach out and book a free consultation to talk more about what we can do to help you.









Leave a Comment